
Whitewashing brick with gray paint cannot be done by directly using gray paint to get the color wanted.
The reason is that if you directly use gray paint color on the brick surface in the color-washing process the color of the brick can still look visible and give impact to the gray paint, so the final look is not gray.
This is especially when the brick is the red brick type.
Although so, it does not mean that you cannot do the color-washing to get a grayish look on your brick surface. There is an alternative way can be done.
The way is by firstly whitewashing the brick surface, no matter it is your interior walls, brick fireplace, or any others, by using white paint color after cleaning the surface thoroughly and then do the second color-washing by using gray paint color for finishing.
The more detailed information about this alternative way can be found in the three most simplistic steps to do in whitewashing brick with gray paint that will be explained especially for you in the following.
Step 1: Cleaning the Brick Surface of Your Walls, Fireplace, or Others
As told earlier, all process in color-washing to change the look of brick into grayish is started by cleaning the brick surface first. This cleaning process is not done merely for making the brick surface clean.
It has a more important function. It is to make sure that the final result has a maximum level.
This can be said so because the clean brick surface can absorb new color easier. Besides, it also will not affect the new color that will be applied to it through the color-washing process.
There are two different types of cleaning you can do.
Of course, the consideration to pick a certain type of cleaning is based on the condition of the brick surface you own.
The two cleaning types are:
1. Simple Cleaning
Items to Prepare : rag or any other thing you can use for cleaning the brick surface.
Just like its name, this simple cleaning process is really simple to do. This is the type of cleaning you can do when the brick surface is not dirty or stained, by soot for example.
As you can see above, the only item you need to prepare is a rag, or any other thing can be used similarly. If by any chance you only have an old rag, it is totally fine as long as the rag is clean.
Since the main idea of this cleaning step is to make sure that the brick surface is clean before a new color is applied to it, there is only one thing you need to do here.
It is none other but wiping down the brick surface to remove old soot and cobwebs from it.
If the brick surface is not too wide, this process can be done faster and easier. If by any chance the surface is quite wide the process will certainly be on the contrary. Besides, it will need more of your energy too.
Therefore, if your brick surface is wider, it is recommended for this process to be done by more than just one person.
This does not only make the process faster to be done, but it will also reduce the use of energy so you will later have extra energy to do the next steps of the gray color-washing by using the whitewashing procedure.
2. Deep Cleaning
Items to Prepare : scrub brush and trisodium phosphate
If the brick surface is quite dirty, such as when there are more cobwebs, more soot, and even more grease, it is more recommended for you to choose this second type of cleaning.
This is applied especially when the brick you own in your home interior or exterior is a fireplace, which is commonly dirtier than a regular brick wall.
In this cleaning type, it is not enough if you only prepare rag because you will need a scrub brush and a special solution, which is trisodium phosphate, more.
FYI, if you have never used trisodium phosphate in cleaning before it can be bought quite easily at stores right now. Usually, it comes in crystalline or granule form.
The way to use this cleaning solution is quite easy because you just need to dissolve it in water before using it.
The ratio between trisodium phosphate and water can usually be found in the packaging so you just need to follow the instruction included or you can just ask about it to the seller.
Once the cleaning solution is ready, the next thing to do is using it together with the scrub brush to clean the brick surface. When done, do not forget to rinse the brick thoroughly by using clean water.
If this cleaning type is the one you choose, there are some things you need to pay more attention to.
The first one is because it is included in the category of wet cleaning, if the brick surface is located in your home interior, it is so much better for you to protect some parts of the interior so that they will not get wet.
The next thing is that when you are done with this deep cleaning process, it is so much better for you to wait until the brick surface is perfectly dry before continuing to the next following steps.
This is needed to be done for the sake of better final result, which is the grayish brick.
Step 2: Whitewashing the Brick Surface by Using White Paint
Now, let us move to the next step, which is whitewashing the brick surface by using white paint.
Since the final result that is expected here is grayish look, you need to realize that this step is meant to create a better base so that later when the gray paint is applied in step 3, the grayish look can be obtained.
This step is quite important because as already mentioned previously, it is not easy to make grayish look visible on the natural brick surface, especially the one with red color if the color-washing process is directly started by using gray paint.
Just like the previous step, this one is also quite simple to do. First of all, there are some items you need to prepare.
Items to Prepare : paintbrush, white paint, water, and rag
1. First of all, you need to prepare the paint as the main thing to use in this color washing.
If by any chance you have some leftover white paint and the amount of it is enough for this project you can use it since this will cost you less money.
In preparing the paint, you need to mix it with water, and the ratio is 1:1. It means 1 part of paint will be mixed with 1 part of water.
So, if you use 1500 ml of white paint, you need to mix it with approximately the same amount of water.
2. When the mixture is ready, the next thing to do is starting the whitewashing by brushing the mixture on the brick surface that later on is followed by the next step in which you will dab the brick surface with the rag you have prepared earlier.
Here, there are several important things that you need to know.
Since the paint mixture is quite watery, this will be absorbed into the bricks quite quickly. Because of this, it is more recommended for you to brush one brick at a time and then directly to dab it with the rag.
This way of whitewashing needs more time and energy. Although so, everything will be paid in the end because, the final result of the whitewashing can be spread more evenly, so it is nicer to see.
Just in case that you are wondering about why you need to dab the brick after the paint mixture is applied to it, this is meant for removing excess paint and drips.
Doing so will avoid ugly-looking whitewashed brick later.
About that also, you need to make sure that the type of rag you use can absorb water well.
To remind you again, this step is better to be done quickly.
Therefore, if it is quite impossible for you to do it alone, you should find at least one other person to do this together with you. Maybe one person can brush the paint on the bricks while the other does the dabbing.
3. The last but not least thing you have to do in this step 2 is seeing the final result of the brick whitewashing and considering about whether or not the bricks are ready for step 3.
If you think that the natural color of the bricks are still too visible and your concern about whether or not the grayish look can be obtained later, it is recommended for you to do the whitewashing once more.
However, you cannot use the same ratio for the paint mixture this time since this will only make the white paint too thick. The suggested ratio here is 1/3:2/3. It is 1/3 part of white paint and 2/3 part of water.
Of course, before whitewashing the brick surface once again, you need to make sure that you need it or not.
Sometimes, the natural look and color of the bricks can factually create an unusually beautiful final look, so there is no need to do the whitewashing process in this step 2 twice.
Step 3: Finishing the Washing Process by Using Gray Paint
The last step you need to do in this project is finishing the color-washing process by using gray paint. This is meant for creating the grayish look you want on the brick surface.
Items to Prepare : gray paint, water, brush, and absorbent rag
This step is quite similar to the step 2 explained to you previously.
You just need to make a mixture of gray paint and water, brush it on each brick, and then dab it directly with the absorbent rag you have prepared.
Just like the previous step also, if by any chance after you do the gray-washing and you still do not get the gray color you want, or if the gray color is too sheer, you can redo the step once more.
However, you have to remember always that color-washing results in a look that is not as thick and solid as color-painting.
Most of the time, there is still sheer characteristic shown in the result. Sometimes, the result can look rather thick too.
Another thing to know about this step is related to the gray paint you have to use.
Here, you can use any brand of gray paint you want. If you have some leftover of gray paint, you can use it too to save cash. Of course, it is as long as the paint is enough for the color-washing.
Besides, you can use not only true gray paint. If you want to create a rather warm look, greige paint with the combination between gray and beige is always a good choice to pick.
Now that you have done all the steps properly the last thing you need to know is that durability is a matter of fact an excellence you can find from this color-washing process.
This can be said so because all paint will be soaked perfectly through the bricks. Of course, this is an excellence because you will not have to worry about scratches as you possibly do when the thing is painted walls.
Inspirations for Gray Whitewashed Brick Surface
To complete everything, below are some inspirational looks you can see so that you will have some ideas about you will gray-wash your interior or exterior bricks.
Remember, to get the look that you want the most; you cannot only pay attention to the type or brand of paint to use. Here, you need to play with the ratio of water and paint too.

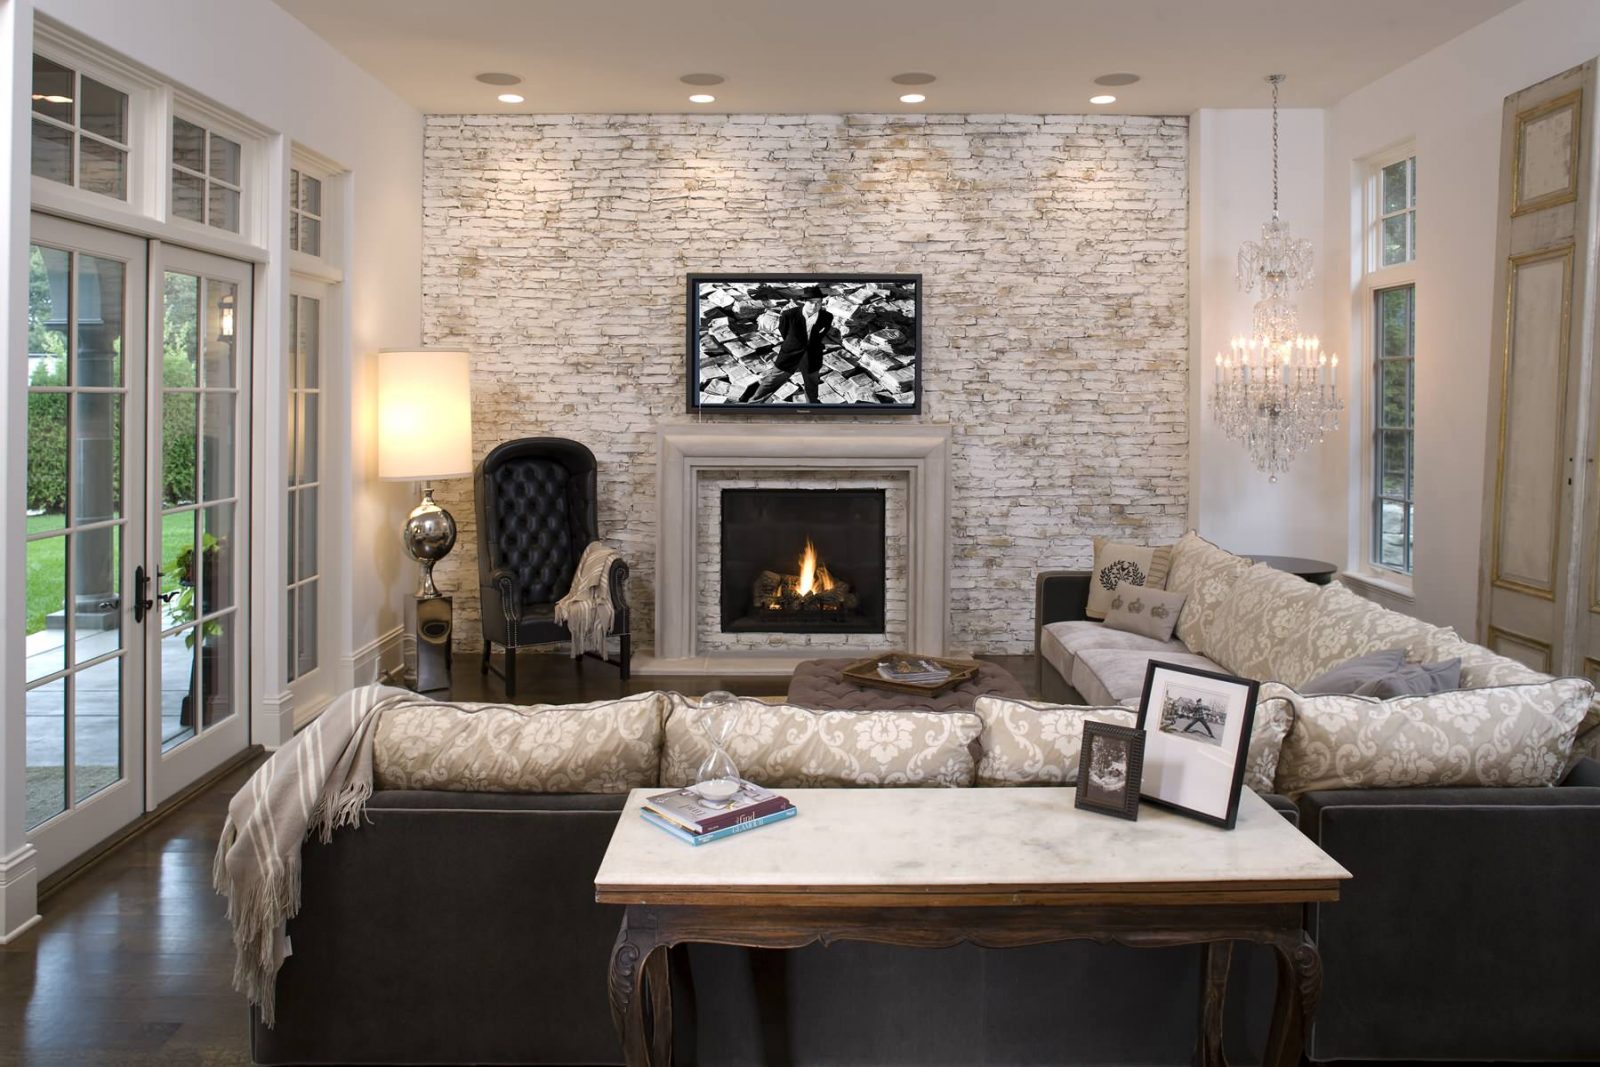
The first inspirational look comes from the picture above.
As you can see in the picture, this chic living room design has an accent wall that is made from bricks, and the bricks have received color-wash process so that it gains grayish look.
One thing found to be interesting here is that the brick accent wall seems to be made from reclaimed bricks instead of new ones. While this may result in a more challenging color-washing process, this gives the interior space a very interesting rustic-looking accent wall.
The next example look you can see in the picture of transitional living room design above is quite interesting. There are several reasons why it is said so.
The first one is because of the oversize brick fireplace mantel that is made to be wall-size. And the second one is because the gray color used here seems to be greige instead of true gray.
This greige color is not only found to be a good pairing to the warm tones added to the room. It at the same time also boosts the warm and inviting atmosphere in the room.
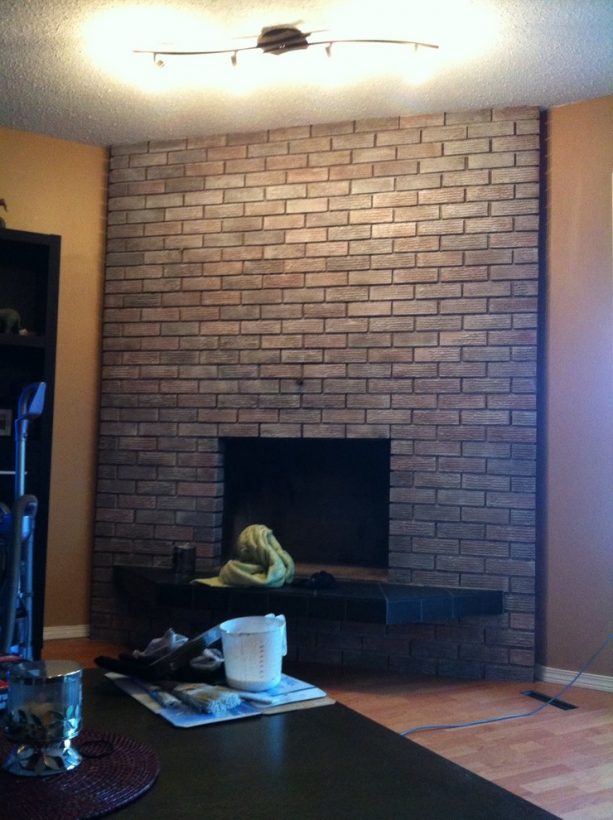
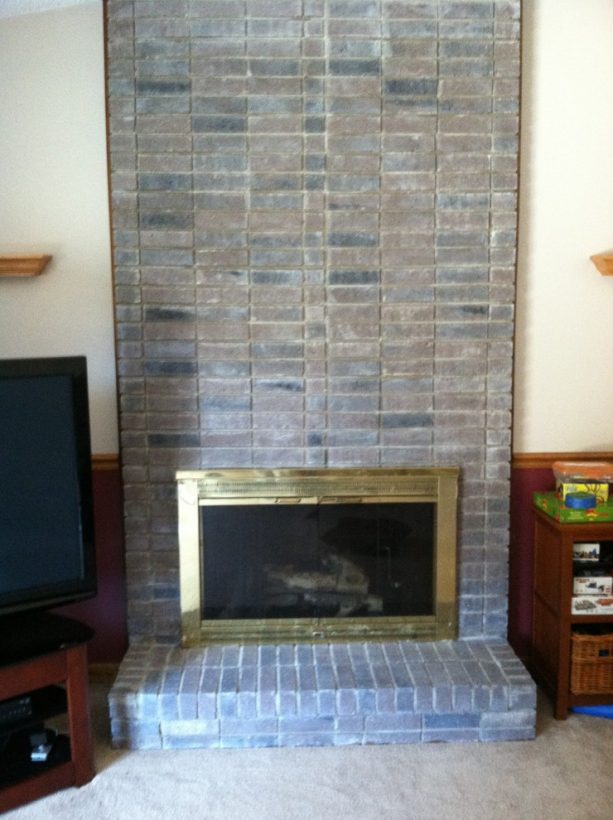
Here is another inspirational look you can check out. It is especially when you are thinking about fireplace brick mantel color-washing.
The inspirational look you can see in the picture above is related more to the rather dark result. This makes the bricks own a color that is rather similar to the color of the concrete surface.
Especially for the brick surface in the picture, you can see it is located in a room with the warmer look. The existence of the brick fireplace mantel with darker gray tone then adds something to cool down the atmosphere in the interior space.
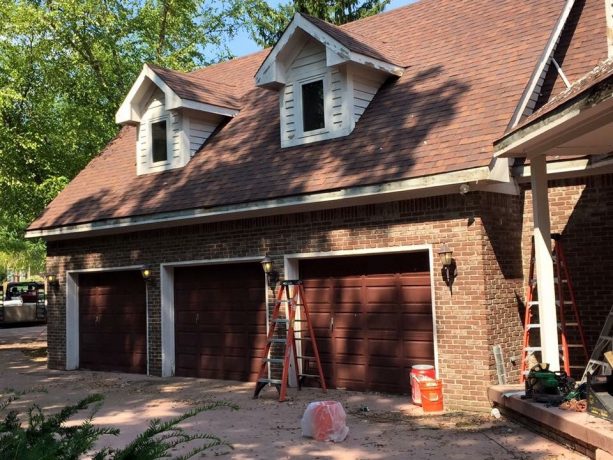
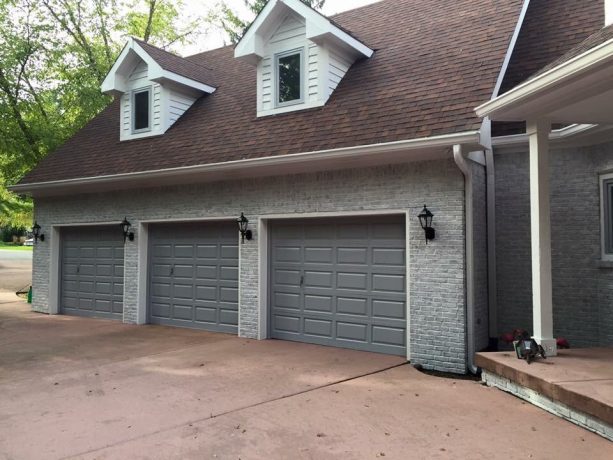
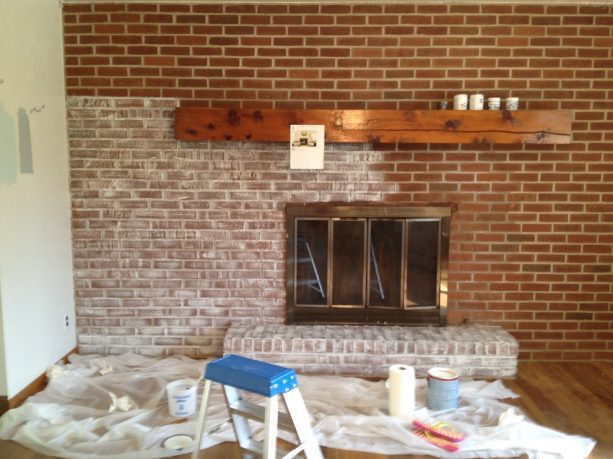
As told previously, color-washing is a process that can be done not only in interior space but also in the exterior area. The example of this can be seen in the before and after photos above.
Before the color-washing, the home exterior is dominated by red bricks walls and doors with penny brown color. After the color-washing, the wall color becomes grayish, and the color of the doors is made to look matching with new fossil gray color.
Just like what you see in the picture, the new color from the color-washing process gives good impact to the home exterior design. It is none other but a more refreshed look that makes the design better than before.
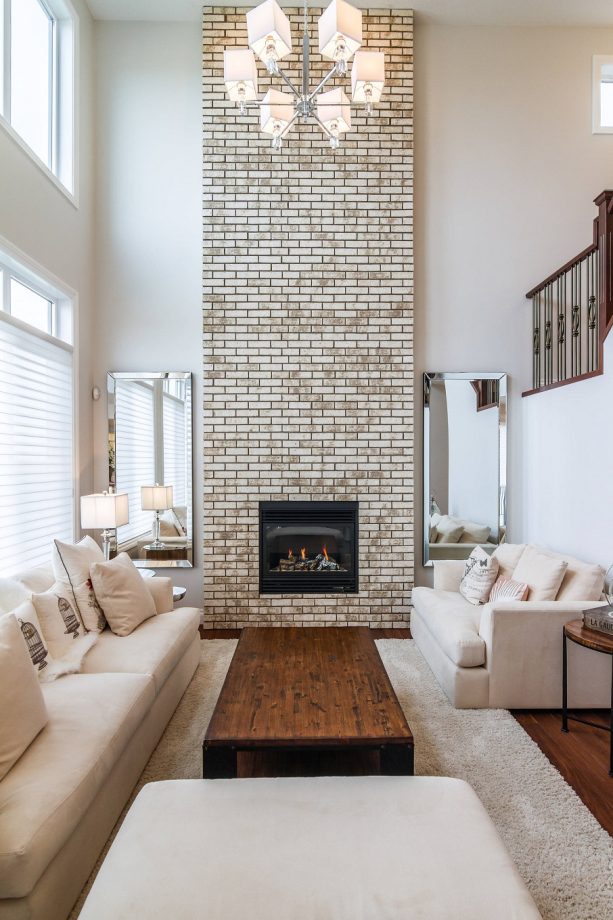
The gray-washed brick fireplace mantel is not only found to be suitable to pair with black modern standard fireplace.
Since the color can act somewhat neutral too, this can be paired with any color, including the golden color fireplace you can see in the picture above.
Other inspiration you should pay more attenti9n to is the way the bricks are gray-washed. It results in different gray shades because the wet paint seems to have changed thickness in the brick fireplace mantel design.

Another good inspirational look can be seen in this picture of the contemporary patio, in which a color-washed brick accent wall that also functions as fireplace mantel is included.
This one is inspirational because the way the color-washing process is done randomly leaves some tiny parts of the original brick color without any color-washing. This results in such a stunning rustic look of the brick wall.
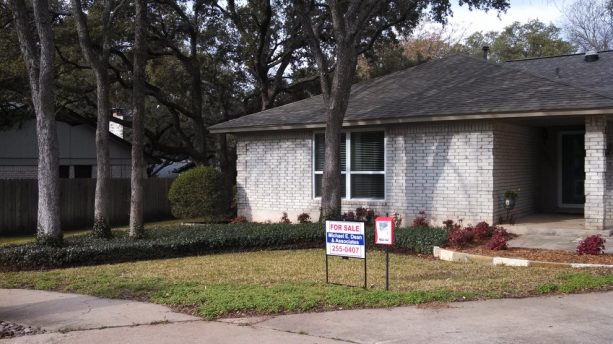
The last but not least example look is in this picture of the exterior wall, which is color-washed with gray paint.
Of course, this one is a massive project and if you want to do such project more people are surely needed to make it faster.
See, the idea of whitewashing brick with gray paint is fascinating, right? More importantly, this can be done only in 3 simple steps as explained in this post.
One thing you should not forget when about to do this project is that planning is essential. This helps you to prepare anything more thoroughly, including also making the type of gray paint to use in finishing the plan to get the gray color you want the most.