
German smear brick is another favorite topic of brick wall coloring project. This coloring method is inseparable from the fact that it uses a technique in which brick is white-outed for the sake of fresh look, especially on the home exterior.

If you are interested in using German smear technique to white out your brick wall, there are at least nine interesting facts you need to know first.
This post will tell you about those all. Let’s start with the definition of German smear first.
What Is German Smear?
As introduced briefly in the opening of this post, German smear is a particular technique used to give white color on some specific types of surface, especially brick surface.
The purpose of this is specifically for updating the brick look that is outdated by time, weather, or something else.
The way to add white color in this technique is by smearing wet white mortar on a surface and then removing some of it before it perfectly dries. People often choose pre-mixed mortar in doing this method since it makes everything faster and easier.
Although the most basic color resulted from German smear technique is white (which is possible in some different shades of white) nowadays many people also add some pigment to the mortar mix so different colors are likely to gain.
Another interesting fact you need to know about this coloring technique is that because of the primary ingredient used German smear is also well-known as mortar wash.
The Differences between German Smear, Limewash, and Whitewash
Many people get confused in differentiating between German smear, limewash, and whitewash since all those at a glance give the quite same look since their primary function is to white out surfaces, especially brick.
So, are they the same? For you to know, they aren’t since there are some differences exist as explained below.
Base Material
The main difference in the three coloring techniques mentioned previously is none other but the materials used.
German smear uses mortar, which is the mixture of cement and sand. Of course, they also need some water when they want to use the mortar in German smear technique.
Limewash uses lime + water. Whitewash uses white latex paint as the base material.
Color Resulted

Other difference is the color produced. White is the only color you can get from white-washing since the man material is white latex paint.
If you choose limewash, you can get more color options since you can add pigment to the primary ingredient.
As for German smear, as told earlier, commonly you can get white color but if you want to you can also add some tint to the mortar and cement mixing.
Application
The way to apply the mortar in German smear technique is also a bit different than the way used in limewash or whitewash methods.
In limewashing and whitewashing you need to use the paint on the surface so that the paint can penetrate into it creating a thin layer of color you can call as patina.
In German-smearing the mortar does not penetrate into the surface. It covers the surface while at the same time creating a new texture on it.
Final Result
The last but not least difference is the final result.
As stated in the previous point, the final result of lime washing and whitewashing is a thin layer of color with white color or some other color if the technique is limewashing with pigmented limewash paint.
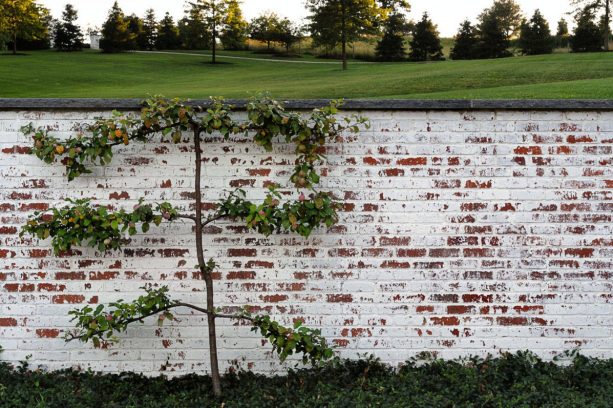
German smear gives a bit different final result since the base ingredient is the mortar that will not absorb into the surface even if the surface is porous like the brick’s surface.
Instead of giving a colored thin layer as the result German smear gives a slightly rough and textured new look that finally gives the surface not only a distressed but also a rustic appearance.
German Smear Prep
Before you change the color of a brick wall by using German smear technique, it is critical to do the prep first, mainly when the wall does not get any cleaning or other treatments for a quite long time.
A thorough prep will get the wall ready for a new white color obtained from German-smearing. Besides, this will also help the mortar to adhere more efficiently on the brick surface.
To start the prep, you need to prepare some tools and material first. All those will be listed below so it will be easier for you to find everything.
Tools
- Stiff bristle brush
- Water sprayer
Material
- Water
All the tools and material mentioned above are easy to get so you won’t face difficulty in preparing them.
Now, let’s move to the step-by-step of the prepping.
- Use the stiff bristle brush to remove mildew, grease, and dirt from the brick.
- When done, spray the brick with water to make sure that there is no mildew, grease, and dirt left, especially on the tiny holes on the brick or the mortar used to connect each brick.
- Then, respray the brick once more for final cleaning.
- Lastly, let the brick entirely dry before you start mortaring.
How to German Smear on Brick
Now that you understand how to do the prep correctly, the next thing to do is to know how to German smear on the brick. There are two main steps to do here, and each also has some steps to do.
Before recognizing all the steps, you need to prepare some materials and tools first.
Materials
- White premixed mortar
- Water
Tools
- Big plastic bucket
- Any utensil to mix the mortar and water or drill and heavy-duty concrete mixing paddle
- Garden hose or stucco sponge
- Grout sponge or trowel
- Wire brush (optional)
- Protective eyewear
- Rubber gloves
- Work clothes for painting or some old clothes (optional)
When you already prepare all the tools mentioned above, it is the time to know the first primary step of using German smear technique on the brick.
But before, you need to wear all safety gears included in the tool list above to avoid some unwanted things to happen. Those include rubber gloves and protective eyewear.
If you don’t want your clothes to get dirty, you can also wear long sleeves or even work clothes designed especially for painting.
If you do not have any of these just wear some old clothes that you don’t mind if it gets dirty because of mortaring.
Creating Mortar
The first primary step to do when you want to use German smear technique is none other but making the mortar. Maybe this sounds like a very simple step to do.
However, you shouldn’t take it lightly because if you want an excellent final result, you need to make sure that the mortar has the right consistency before you apply it to the brick.
Slurry but not too watery is the consistency you need here. This texture does not only allow the mortar to dry longer but also makes the adhesion optimal.
Therefore the recommended ratio between the mortar and the water is 70 of mortar and 30 of water.
The simple steps to create your mortar and water mixture are explained briefly in the following.
- Put mortar and water in the plastic bucket with a ratio of 70% mortar and 30% water.
- Mix them thoroughly. If you need a lot of mixtures, it seems better and stronger tools are required to help you mix the mortar. The examples are powerful drill and heavy-duty concrete mixing paddle.
- Check the consistency of the mortar for the desired result.
It is true that the recommended consistency is slurry. If you are having difficulty in imagining how it looks, just imagine peanut butter in your mind since the meant texture is more or less the same.
One thing you need to know is that it is possible for you to make the consistency thicker or thinner by adding more or less water to the mortar. Thicker consistency tends to create a heavier texture on your brick. On the other hand, lighter consistency usually results in a clearer texture.
If by any chance you are not sure about which consistency to choose you can do a simple test by creating two or three different mortar mixtures with different consistencies.
When they are ready, you can apply each of them on a separate small brick area and see which one is the best according to your taste.
Applying Mortar
The next primary step to do is applying the mortar you have prepared previously on the brick. All the steps will be explained to you clearly as followed.
1. Dampen the Brick Surface
If you do the project for your exterior, you just need to dampen the brick by spraying water on it using a garden hose.
If you do it for your home interior, you can make the brick damp by using wet stucco sponge since it is the best thing to do.
Dampening the brick like this does not only make the mortar sticks better on the brick. It also gives you extra time in perfecting the look as explained in the next points.
2. Smear the Wet White Mortar on the Brick by Using Grout Sponge or Trowel.
In this step, if you want to you can also use your hand to smear the mortar if you think it is the most suitable way. If so, you must not forget wearing your rubber gloves on when spreading the mortar mix.
The most important thing is not about what tool you use to smear the mortar. Making sure that you don’t spread the mortar too thickly or too thinly is more crucial here.
You also need to know that it is much better to spread the mortar from the top to bottom area. You must not forget the joints too.
Of course, you cannot directly cover a vast area with mortar at once since this will only be troublesome.
Therefore, what we recommend you to do is covering approximately 5×5 feet area at most. Finish this area by following the next step first before you coat another area.
3. Let the Mortar Set for a While
When done covering a brick area with wet white mortar, the next thing you need to do is letting the mortar set for a while.
Here, you must remember that you shouldn’t let the mortar perfectly set and dry since this will only ruin the German smear technique you use from the beginning.
FYI, it usually takes approximately 20 up to 45 minutes for a mortar mix to get perfectly dry on a brick surface. It means you should only let the mixture set on the surface for less than 20 minutes.
4. Remove Some of the Mortar When it is Still Semi-wet
When the mortar is still in its semi-white state, remove some of it by using the trowel you use previously or a wire brush.
This method can be said to be the most important of German smear technique. This technique is also the one that won’t only give the brick wall unique look but also distinct texture.
If you question about how much mortar you should remove from the brick, it depends on your taste.
You can remove a small portion of the mortar if you are more interested in lightly showing the original color of the brick.
On the other hand, you can remove a significant mortar portion to get the look as if someone made the wall by setting in bricks in irregular sizes in large mortar joints.
5. Let the Rest of the Mortar Dry
This step may take less than 20 minutes.
German Smear Brick Fireplace
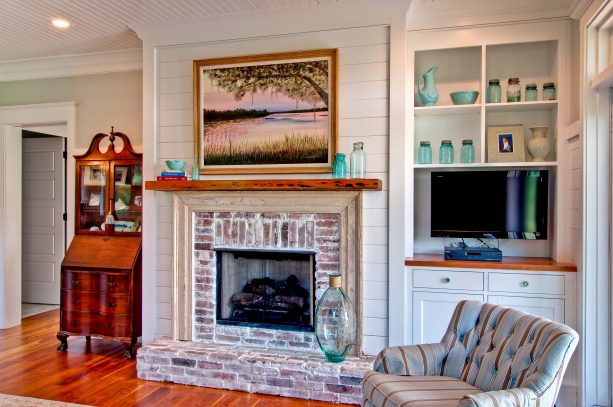
Using German smear method on a brick fireplace is the same. The only difference is the prep you need to do first.
If you use the method on a regular brick wall, you can just use water to clean the brick as explained in the subheading about the prep above.
On the other hand, if you use the coloring method on brick fireplace an in-depth cleaning is necessary.
Thankfully, there are a lot of commercial brick fireplace cleaning products available right now. But if you want to go more natural, you can always count on to vinegar and water cleaning solution.
Treatment
When you German smear a brick wall, no matter whether it is an exterior wall or an interior wall, you need to know that the result is permanent. Of course, it does not mean that the wall will not require any treatment after.
The good thing is that you can maintain a German-smeared brick wall quite easily.
For an exterior brick wall, you just need to spray it with water by using a garden hose once in a while. The function of this is for removing dust or dirt that is built up by time on the wall.
Compared to an exterior brick wall, an interior brick wall does not need any treatment. However, if you find some dirt or dust, you can lightly wash the wall by using particular solution designed for an interior brick wall.
A bit different method is needed if the brick is a fireplace since you have to deal with soot deposits.
In this case, you can always count on to commercial brick cleaning product, or if you want to go more naturally, you can create a cleaning solution by mixing vinegar and water with a ratio of 1:1.
Removal
Removing dried mortar from brick is a difficult thing to do. The only reason behind this is that mortar is something that adheres on masonry quite strongly.
In simpler words, we can say that German smear technique results in something permanent so you need to contemplate everything before deciding to use this method on your brick wall.
The question then is; can you remove German smear from brick? Although it is tough to do, the answer to the question is yes.
To remove German smear from brick, you need to scrub the surface extensively. Besides, you possibly need to use some specific solution too to make the process easier. The recommended one is muriatic acid.
Pros and Cons
Now that you already know about many interesting facts about German smear technique, it is the tome for you to recognize also about the pros and cons of it.
This information will be beneficial for you in deciding whether or not you need to color your brick wall using the method.
Pros
- Everyone can do this method since no expert skill required.
- It is a considered-inexpensive brick makeover method.
- The materials needed are easy to get and to use.
- It creates a very pleasing distressed rustic look.
Cons
- It is a labor-intensive method, which means you require a lot of time and energy to do the process. The time you need to finish this process could be days.
- The result is permanent and quite hard to remove.
- You cannot apply the method on painted brick since mortar can’t adhere on a painted brick surface.
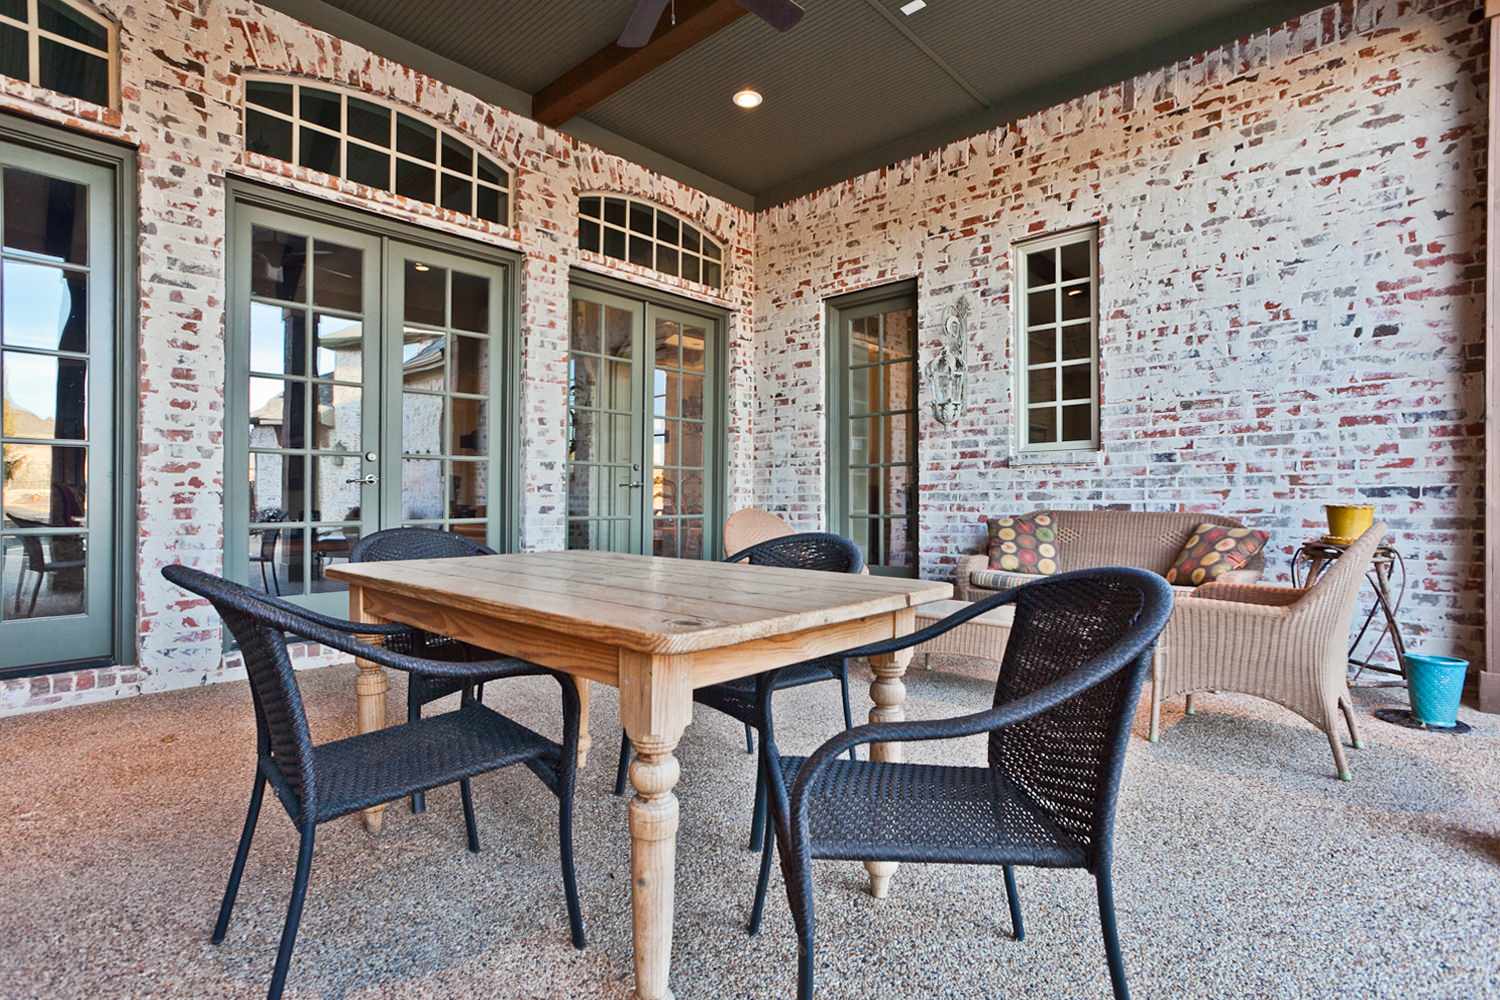
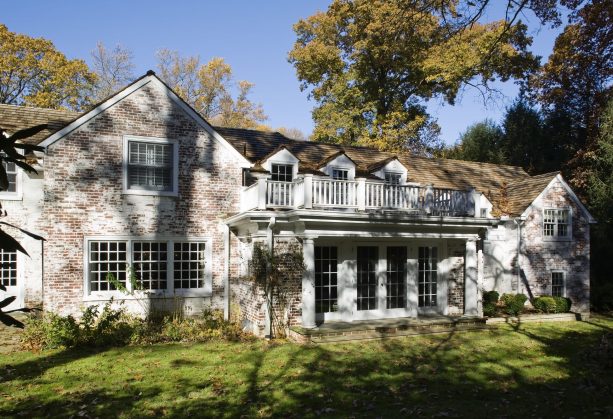
German Smear Brick Before and After
For more inspirations, you can check out the following before-and-after photo of German smear brick.
This one is a before-and-after photo of a house with a red brick exterior. The exterior turns white after getting German smear technique.

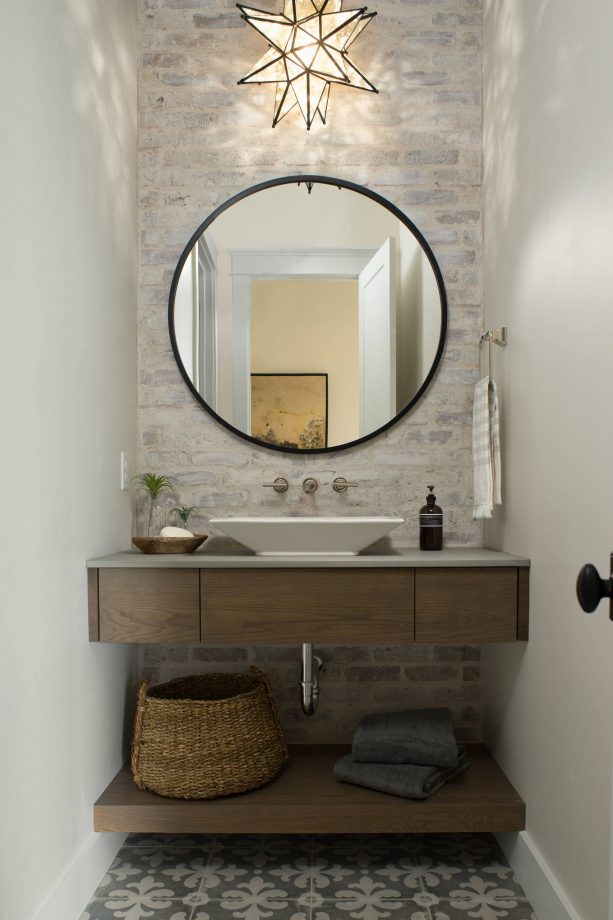
This one is the after photo of a powder room interior that has a German smear accent brick wall. The coloring method gives the regular accent brick wall a reclaimed look.
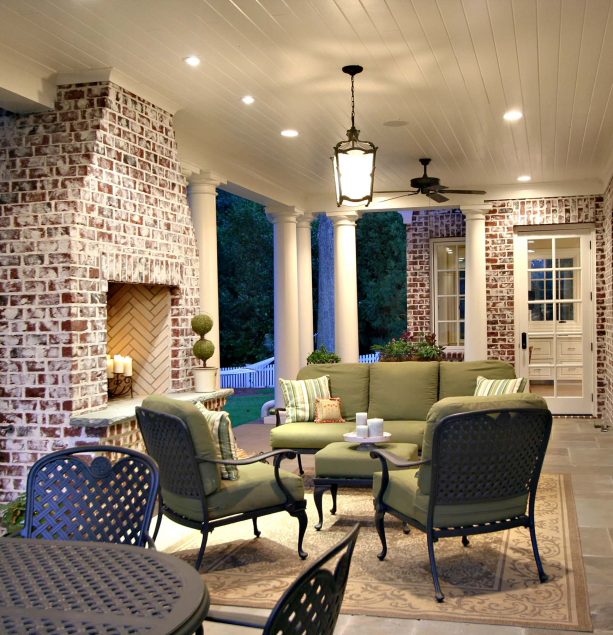
The last but not least is this after photo of a brick fireplace with German smear coloring technique. The designer mentions that one difficulty in using this method is keeping the consistency of the color stable.
So, what do you think about German smear brick technique? It indeed is another interesting method to color your brick wall, right?
With all the facts shared here, hopefully, you will gain beneficial information that will help you in using the German smear technique better.
Expectedly, with all the points shared here, you can also do the suggested and non-suggested things to do when you finally decide to German smear your brick wall.